Home assistant уведомления на телефон
Home Assistant — это open-source платформа для организации автоматизации системы умный дом. Home Assistant представляет собой модульное приложение с открытым исходным кодом, работающее на языке программирования Python 3. С помощью платформы можно отслеживать и контролировать все установленные устройства в доме. Платформа устанавливается на любой девайс, в том числе и на одноплатный компьютер Raspberry PI. Используя Home Assistant вся умная техника в доме, выстраивается в одну логическую цепь, взаимодействуя с пользователем через интуитивно понятный интерфейс приложения. В программе предустановлено множество устройств бытовой техники, датчиков, сенсоров, роботизированной техники, как именитых брендов, так и менее известных. Продвинутые пользователи при необходимости могут самостоятельно дописать недостающее устройство в приложение, создав отдельный модуль. Устанавливая Home Assistant пользователь настраивает график работы, или по другому автоматизацию, для любого электронного-процессорного устройства в доме, а в совокупности слаженную работу всех девайсов. На современном рынке с элементами умного управления уже есть холодильники, стиральные машины, печи, мелкая бытовая техника, освещение и розетки, а также роботизированная техника, такая как робот-пылесос или мойщик окон. Использование платформы объединяющей всю умную технику в одном интерфейсе значительно снижают вовлеченность человека в повседневную рутину. Каждое устройство сработает согласно заранее заданному алгоритму.
Примеры автоматизаций в Home Assistant:
Четкая и слаженная работа каждого девайса это результат тщательно прописанного алгоритма автоматизации. Основные характеристики и преимущества платформы:
Приложение Home Assistant поддерживает в той или иной мере совместную работу с другими приложениями “умный дом”. К примеру, совместная работа с Apple HomeKit может быть частично некорректной, тогда как при работе с Xiaomi Smart Home нареканий практически нет. На данный момент приложение Home Assistant можно установить на любой девайс, поддерживается работа со всеми известными операционными системами. Поддерживаемые ОС:
Поддерживаемые компоненты: 545 шт., включая почти все TV/AV receivers, Broadlink, ZigBee, iCloud, Yandex TTS и многое другое. Начало и окончание каждой автоматизации дублируется системой уведомления. Получать данные от Home Assistant можно на любой канал связи. Среди возможных способов получения есть достаточно простой ‒ получение PUSH уведомлений на Android. Создать такую связку можно используя интеграцию Notify Events.
Notifications
The notify integration makes it possible to send notifications to a wide variety of platforms. To use it you have to setup at least one notification target (notifier), check the integrations list for one that fits your use case.
If you want to send notifications to the Home Assistant web interface, you may use the Persistent Notification integration.
Service
Once loaded, the notify platform will expose a service that can be called to send notifications.
| Service data attribute | Optional | Description |
|---|---|---|
| message | no | Body of the notification. |
| title | yes | Title of the notification. |
| target | yes | Some platforms allow specifying a recipient that will receive the notification. See your platform page if it is supported. |
| data | yes | On platforms who have extended functionality. See your platform page if it is supported. |
The notify integration supports specifying templates. This will allow you to use the current state of Home Assistant in your notifications.
In an action of your automation setup it could look like this with a customized subject.
Test if it works
After you setup a notifier a simple way to test if you have set up your notify platform correctly, is to open Developer Tools from the sidebar and then select the Services tab. Choose your service from the Service dropdown menu, enter the sample below into the Service Data field, and press the CALL SERVICE button.
Home-assistant кликабельные уведомления в IOS. Полуавтоматизация.


Кое что из моих сочинений на свободную тематику:
В прошлый раз мнения разделились, поэтому статья будет без юмора, и полная серьезности. То есть сухая и техническая.

Кто первый пошутит про цифры на скрине?
Вводная.
Итак, стратегия умного дома (на бумаге) подразумевает, что система сама знает, что нужно пользователю в данный момент и делает его жизнь лучше и удобней без его участия.
Система сама знает, что, когда я подхожу к дому, нужно включить чайник, за час до срабатывания будильника надо включить теплый пол, когда все ушли из дома, пора запустить пылесос, и тд
Практическая часть
На данный момент, есть два основных варианта, чтобы удобно это реализовать. (По факту больше, но это уже совсем вкусовщина, и предположу, что она не носит массовый характер)
1. Телеграмм (Но он же заблокирован, хаха)
С телегой я игрался, но она не зашла настолько, насколько понравился нативный пуш на яблочных устройствах.
Дальше будет все совсем сухо.
И настраиваем подключение к HA
(*То приложение что сейчас находиться в эпл сторе, может подключаться только через Legacy API Password. Если вы используете авторизацию по логину и паролю, то варианта 2. Первый: включить Legacy API Password, второй: поставить бету через TestFlight, а заодно и стать бета тестером)
Далее идем в Notification settings, и там жмем update push settings.
Рассмотрим на примере автоматизации для увлажнителя. Здесь смысл следующий, если влажность опускается ниже 20%, то нам приходит уведомление с вариантами действия: Включить и включить на 1 час.
Теперь перейдем к конфигам ассистента.
Разберем этот пример.
Setup Home Assistant Push Notifications (The Easiest Method)
Home Assistant has a very powerful notification system whereby it is possible to produce many different types of custom notification.
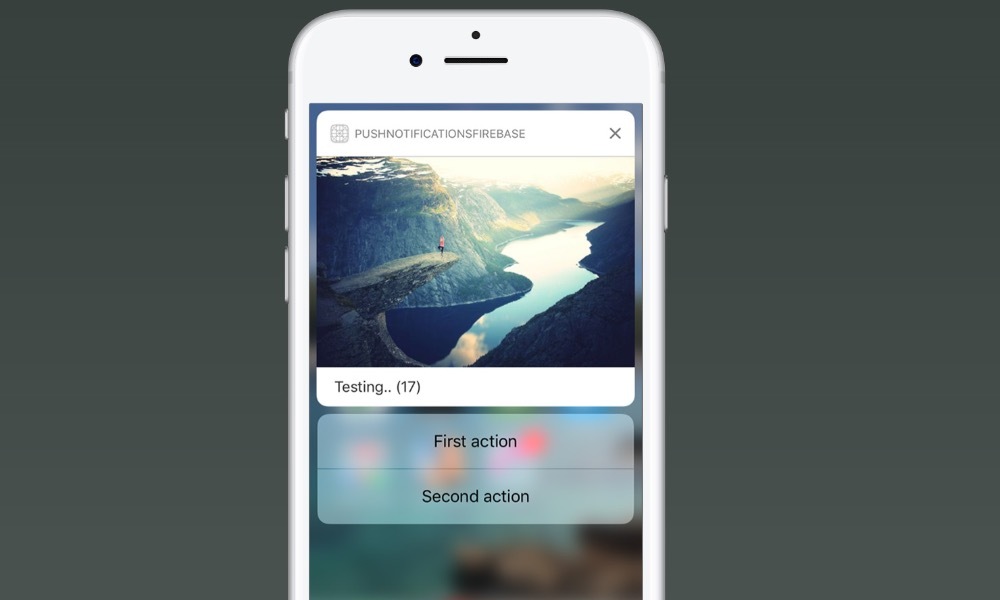
Since the release of version 2 of the Home Assistant mobile app, support for custom push notifications has been added. Awesome!
Like with other notifications, this type of notification is accessible by using the Home Assistant notify service.
Prerequisite
You should have Home Assistant installed and running. A basic understanding of YAML would also be highly beneficial.
If you are not yet familiar with automation or YAML then I would recommend reading the tutorials about automation and scripts first.
You will also need the Home Assistant app installed on at least one device. The Home Assistant Companion App can be downloaded from the iOS App Store or Play Store.
You will also either need the file editor add-on or be familiar with editing the files using your favorite text editor. If you are not familiar with either you may want to check out my tutorial on automation or scripts first.
Configure Home Assistant
You need to be running Home Assistant version 0.95 or newer, I would recommend just updating to the latest version.
First we need to make sure that the default_config integration is added to our configuration.yaml file. If not then you can go ahead and add it.
If there is some reason that you have removed it, you can instead enter the following.
So long as you have either of these options within your configuration.yaml file, the companion app will automatically configure itself.
Notification automation
You can utilise push notifications anywhere that you would normally use the notify service in Home Assistant. For this example we will setup a basic automation to test and demonstrate the functionality.
As we are creating a new automation, we will be adding the code to our automation integration within the configuration.yaml file.
Alternatively if you are using automation.yaml generated by the automation GUI or you already have automation in your configuration.yaml file, simply add the code beneath the existing code.
Add a trigger
Next we need to add a trigger for our automation. For this example we will create a simple notification that informs us when a lamp is switched on.
We will use the state platform in order to trigger the automation when the state of a light entity changes to ‘on,’ in this case my tree lamp. You should of course choose your own light entity.
Add a notification action
Now that we have an automation setup with our desired trigger, we can create an action that sends the push notification to our mobile device.
We will use the service notify.mobile_app_ where will be the name of your mobile device integration in Home Assistant. In my case this is simply notify.mobile_app_iphone.
Title and message
Now we can add our notification title and message as desired.
When the notification fires, it will look something like this.
Subtitle
If you are using an iOS device it is also possible to add a subtitle, which appears below the main title and above the message.
Grouping notifications
It is also possible to group notifications if you are using iOS 12 or newer. All notifications that share the same thread-id will be grouped in the notifications center.
Troubleshooting
Conclusion
That’s it! You should now be able to set up some awesome push notifications!
In this tutorial we looked at a basic example of how a push notification can be sent to a mobile device using an automation. The integration works very well and makes for yet another superb Home Assistant feature.
You should now have the basic knowledge required to add notifications to more useful applications, such as my easy Home Assistant DIY thermostat.
Also check out my tutorial on push notifications and actionable buttons to add a button to your notification!
Thanks for taking the time to read the tutorial and for visiting my site! Be sure to check out some of my other awesome Home Assistant tutorials!
SMS notifications via GSM-modem
The sms integration allows having a local execution SMS notification via Gammu. This is ideal when the internet is offline or when the power goes out.
This integration provides the following platforms:
Configuration
You can also enable SMS via your configuration.yaml file:
To configure the notification service, edit your configuration.yaml file:
Configuration Variables
The gsm modem device.
Notifications
You can also receive SMS messages that are sent to the SIM card number in your device. Every time there is a message received, event: sms.incoming_sms is fired with date, phone number and text message.
If the integration is used with the Home Assistant Operating System, then version 3.6 or higher is required.
For installations not running on Home Assistant or Home Assistant Core using Docker, you must install gammu-dev package:
Before running for the first time, check that the system recognizes the modem by running:
Note: When running Home Assistant, you need to install the SSH add-on.
Required Hardware
You will need a USB GSM stick modem or device like SIM800L v2 connected via USB UART.
List of modems known to work
List of modems known to NOT work
List of modems that may work
Search in the Gammu database for modems with AT connection.
Huawei modems on Raspberry Pi (and similar) devices
For some unknown reason, the rule that converts these modems from storage devices into serial devices does not run automatically. To work around this problem, follow the procedure to create udev rule on a configuration USB stick for the device to switch to serial mode.
Try disable virtual cd-rom and change work mode “only modem”. After this modem correct work on Raspberry Pi without ‘udev’ rule.
Identify the brand for your GSM modem, copy the brand_Id and product_id (In this case brand_id = 12d1 and product_Id = 15ca )
Set this content in file udev\10-gsm-modem.rules in the configuration USB: (Replace brand_Id and product_id for the numbers reported by lsusb )
Here is a sample configuration file: